Do you get plenty of visitors to your website but low conversions? Do you need to turn your website into a lead generating machine?
An optimized website conversion funnel is critical to your success.
If you are selling a product or service online or even trying to get visitors to take a simple action like signing up for a free newsletter, you already have a conversion funnel. If you are not getting conversions, then your funnel is not optimized.
Are you ready to learn how to improve your website conversion rates? Read on to understand the conversion process so that you can apply it to your funnel and take actions to improve it.
What is a Website Conversion Funnel?
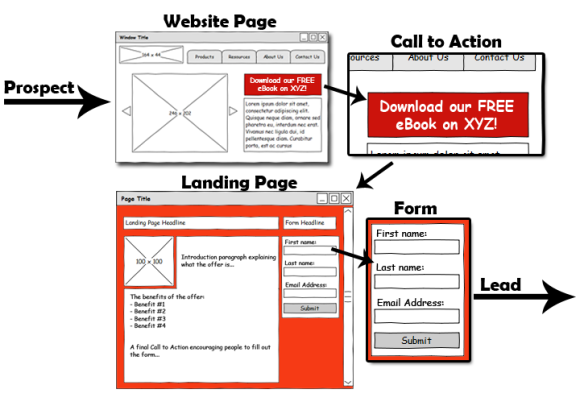
A website conversion funnel combines 5 elements together to help convert a website visitor into a lead.
- A call to action (CTA)
- A landing Page
- A form
- A thank you page
- A personalized confirmation email
A properly designed website conversion path clearly guides your website visitors through the conversion process:
Visitor -> Prospect -> Lead
A poorly designed conversion path causes confusion, diminishes the user experience, and reduces the number of leads your website converts into customers. So let’s check out how to setup your conversion path properly.
Step 1: Create and Place a Call To Action
A CTA is the text or button anywhere on your website that creates excitement about your offer and links to your landing page. Your CTA should:
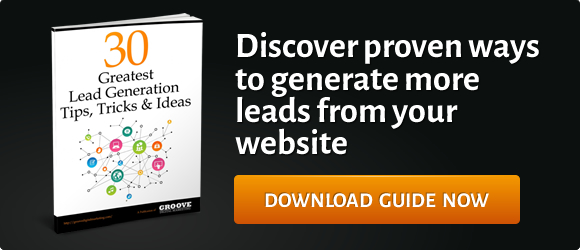
- Be short and clear, the button should contain 2-5 words maximum.Call to Action Example
- Use urgent, action oriented language. For example, “Download Your Free Report Today” or “Sign Up Now”.
- Go above the fold whenever possible to increase the number of visitors that see it. You might also consider CTA pop ups that capture your visitors attention when they try to leave.
- Stand out! Use colors that are different from your website and design great graphics that get noticed.
- Limit each web page to one CTA, so the visitor doesn’t get confused and make sure the offer on the landing page matches the CTA.
When it comes to conversion rate optimization,your call-to-action buttons are the ultimate low-hanging fruit. – Michael Aagaard, ContentVerve.com
Every page of your website should have a CTA placed on it that is relevant to the copy on the page. This will ensure that visitors that enter your website from search engines or social media see the offers you have available.
Be sure to test your CTAs to improve the click through rates as high as possible. Need some ideas on how to improve your CTA? Here’s some great hints and tips.
Step 2: Create a Relevant Landing Page
When a visitor clicks on a CTA they must be sent to a landing page. Your landing page should:
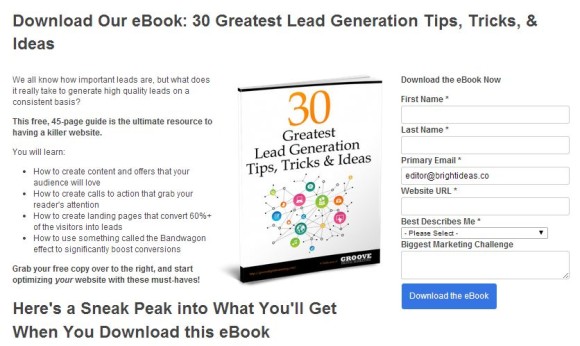
- Have a clear headline that tells what the offer is.
- Include an image or graphic related to your offer. A page full of text is boring.
- Clear and compelling content that provides detailed information on the offer. The prospect must believe the offer is current, relevant, and that they will benefit from it.
- Contain bullet points that outline the benefits of the offer.
- Include a working form that is visible above the fold.
Step 3: Create a Form
If your landing page doesn’t include a form, you will give away free content without gaining anything in return.
NO FORM = NO LEADS
Your form is the final barrier to a prospect becoming a lead, so it is important to get it right. Your goal is to get as many prospects as possible to complete the form and convert into a lead.
The number of fields on the form causes the most resistance. Compare the amount of information you ask for in your form to the value of the information you are offering.
The number of fields on your form will depend on:
Stage in the website conversion funnel
You may choose to only ask for a name and email if you’re offering a checklist, a one-page report, or an infographic that showcases your services. However, if you’re giving away something more significant like an eBook or whitepaper, you can request more details, as shown in our landing page example above. Generally, prospects seeking more detailed information are further along in the process and are more likely to share the extra information.
How many leads you need to generate
Forms with more fields will filter out more prospects. The trade off is that the additional information will result in a better qualified lead.
If you are getting too many leads that don’t convert consider adding more fields to your forms. If you need more leads, include fewer form fields.
Step 4: Thank You Page
Once your prospect completes the form on the landing page then they have successfully dropped down the website conversion funnel to become a lead. Congratulations, this means your funnel is working!
Now you need to send your prospect somewhere that confirms that their submission worked. A thank you page can help cement your new relationship by including access to the information they requested as well as pointing them to additional information that they may be interested in.
It should also include links that enable the lead to share the offer with people within their social networks or email contacts, and it should include a personal touch to (after all, you did just ask them for a load of data, so put it to good use!)
Your thank-you page should also:
- Let your new leads share your offer via email or social media.
- Continue the conversion process with a follow-up offer. This offer should be for the product or service that is the next stage is in your buying cycle.
- Include a personal touch. At a minimum include the lead’s name, but if you asked for a load of data, think about how you can integrate some of that into the page to make it feel like it was made just for them.
Step 5: Personalized Email
The last element within the website conversion funnel is the confirmation email. This email makes it easy for your leads to find the offer again later.
The confirmation email should have similar design elements as the thank you page:
- Personalization!
- The promised offer as an attachment, or a link to the thank-you page where they can get the promised offer.
- Include a follow up offer.
- Provide a simple way for leads to share your offer on social media.
That’s it! Now it’s time to nurture your leads. Keep your business in front of your leads with a steady stream of relevant and engaging content and turn them into buyers.