I am sure we can all agree, Photoshop is a household name in design and editing. However, is it still an absolute must-use for eCommerce? The short answer? Most definitely! When it comes to why use Photoshop for eCommerce, especially for lean business owners DYI-ing a lot of their tasks, it’s a no-brainer!
Photoshop is the #1 post-production and design program used by developers, designers, graphic designers, photographers, and other creatives to edit and retouch photos, create graphics and images and create websites and product mockups.
But, it’s not just for designers. With more and more eCommerce entrepreneurs like yourselves running lean, with a successful online business requiring you to wear many hats in business, Photoshop is a must-have tool.
So, Why Should You Use Photoshop for eCommerce?
When it comes to mastering your DIY product photography and white-background images like a pro – creating good-quality marketing graphics and developing new product mockups and designs – Photoshop is a robust tool for online sellers and is well worth the investment. Plus, it offers users a bunch of tools, presets and atomization to make editing and post-production far more streamlined.
Unless you are outsourcing all your design (product and marketing), product photography and post-production edits, you need Photoshop.
The trick to mastering Photoshop for eCommerce, without being a professional designer, is following the right tutorials. Take it from someone who has used photoshop over ten years for all of the above tasks – I still consult tutorials for specific tasks.
Therefore, to help you navigate the most essential Photoshop tools for eCommerce, from beginner to expert level, we’ve put together this list of tutorials and tools that cover your three main eCommerce photo and image needs.
- Product Photos
- Marketing Images
- Product Design
Let’s dive in!
Using Photoshop for Product and Lifestyle Photos, Post-Production
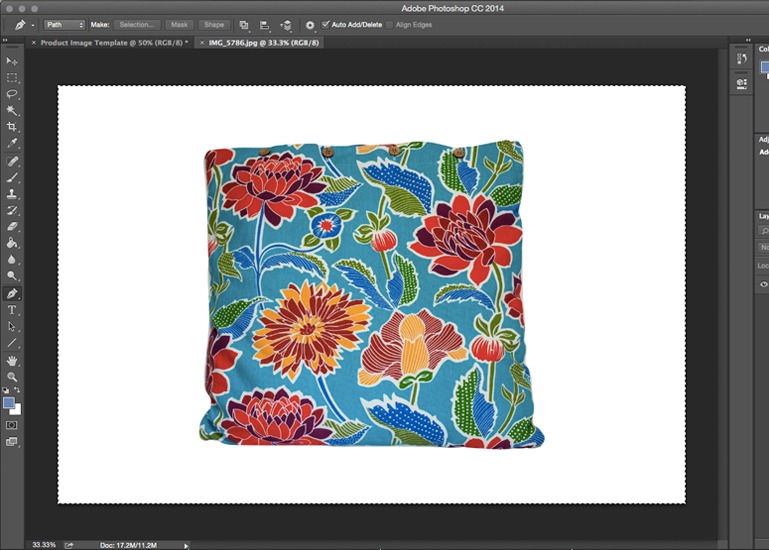
1. Product Photo Background Removal
Being able to remove backgrounds from your product photos is one of the most used post-production Photoshop hacks for online sellers. It is also one of the simplest uses for Photoshop for eCommerce. Simply put, by removing backgrounds, you are able to get rid of distracting elements, marks, and shadows, as well as change backgrounds more easily as needed.
In other words, you create and increase the quality of white background product photos, allowing you to keep them consistent while also adjusting background colors and styles for marketing graphics.
You could also use it to remove backgrounds on lifestyle and marketing photos, enabling you to change designs for marketing or implement uniform images onto your online store. Here’s a tutorial on how you can do just that!
If you’re looking for a product photo-specific photoshop tutorial, here’s a guide on deleting and replacing a product background with white.
2. Photoshop Blur Tool for Product Photos
Adding background blur to your images, especially your lifestyle product photos, is a great way to add complexity and depth to your photos and make them pop. To do this, you will need to separate your product or subject from the background, as shown in the above product photo tutorial, create a layer mask, and then use Photoshop’s blur tools to adjust your background blur.
Here is a post-production eCommerce tutorial from Akemi Hiatt, co-owner and creative director at Hidden Gears that walks you through creating the blur effect in eCommerce images.
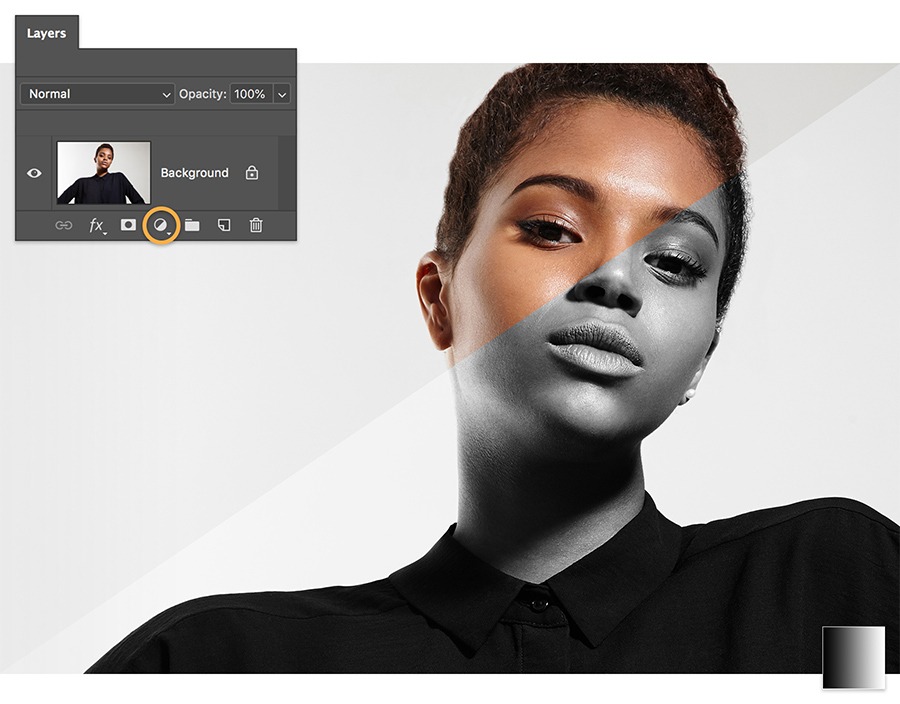
3. Duotone Color Tool for eCommerce
If you’re not familiar with Duotone, it’s a design technique whereby an image is edited to show two contrasting colors. In fact, this design trend has made it all the way to apparel product design as well!
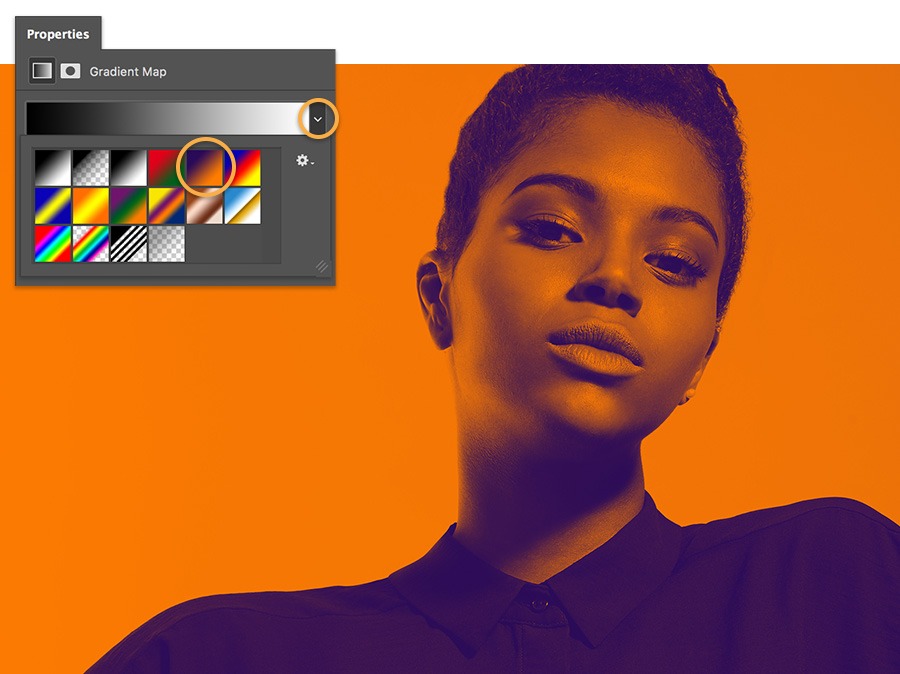
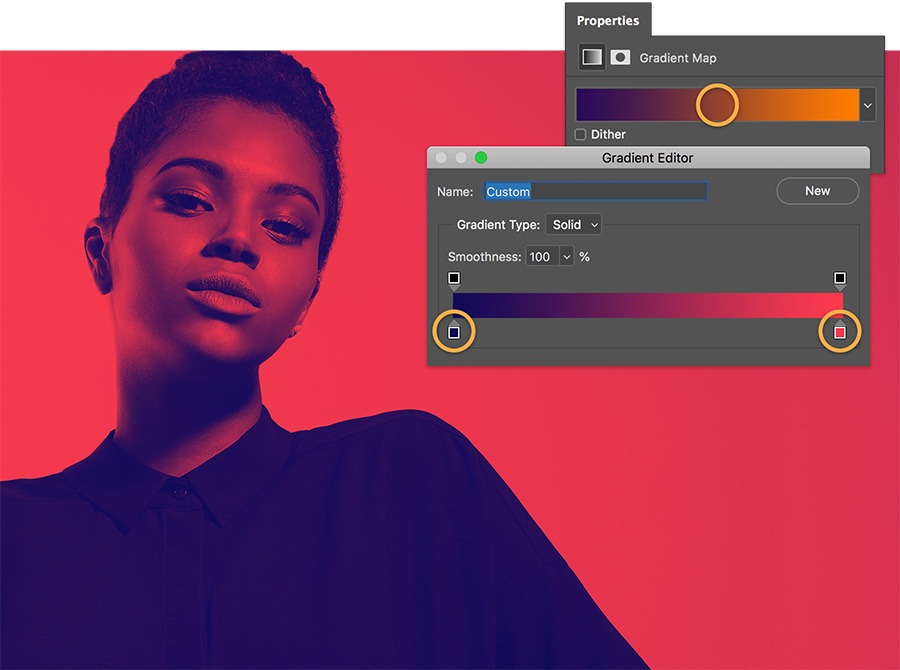
As this changes the tone of your products, we suggest you only include duotone creatives on your website or in marketing to give a modern, retro feel to your products and product lifestyle shots. You wouldn’t, for instance, want to use this technique as your main product page photo as it won’t be a true representation of your product. Instead, you can use it to add a contemporary feel to your marketing and brand, and Photoshop is the ideal tool for this. Here is a quick step-by-step guide from Adobe:
Step 1: Prepare your photo
Step 2: Add color
Step 3: Adjust the shade
Step 4: Intensify your spectrum
There are abundant tools out there for duotone designs, such as free duotone Photoshop gradient presets you can download – like these. Alternatively, you can use design markets, such as Creative Market, to source ready-made duotone design packs for social media and other marketing assets.
4. Product Hue/Saturation Editing
The next Photoshop tool you need in your eCommerce bag of tricks is the hue/saturation tool. When you adjust the saturation of your product photos, you are editing the vibrancy of the color. With hue, you are adjusting the tones of colors.
Why are they so handy?
Unlike the brightness tool where you adjust the photo as a whole, hue and saturation allows you to select specific colors in your product image and adjust them accordingly. It also enables you to quickly change the product colors in your photos.
Let’s say you’re selling bracelets. You have been selling a blue variant that you have a good product photo for, but have recently added a new pink variant to your list that you want to get on your store ASAP. Until you have a chance to get new product photos, you could use hue and saturation to edit your blue variant to pink. Tech Buzz outlines exactly how to do that here, where the image goes from blue to pink, as shown below.
They also show us that you can adjust the hue of the clasp from gold to silver, as well.
In short, this Photoshop hack for eCommerce will allow you to keep product photos consistent and help you get new products on your online store quicker. Here’s an advanced Photoshop tutorial that shows you how to adjust hue and saturation in different objects in your product photos:
5. Gradients Tool
Photoshop’s gradients tool is another post-production editing feature that you should know how to navigate. You may not use this tool for product page photos, but it can be effective in home page and marketing designs if you want to give your products a sense of drama that comes from fancy lighting, without the need for expensive equipment.
Newbie Tip: If you haven’t used Photoshop’s gradient tool before, I suggest this beginner’s step-by-step guide from Adobe that explains the difference between linear, radial, angular, reflected and diamond gradients.
Here’s a simple, quick tutorial on how you can use the gradients tool for product photos:
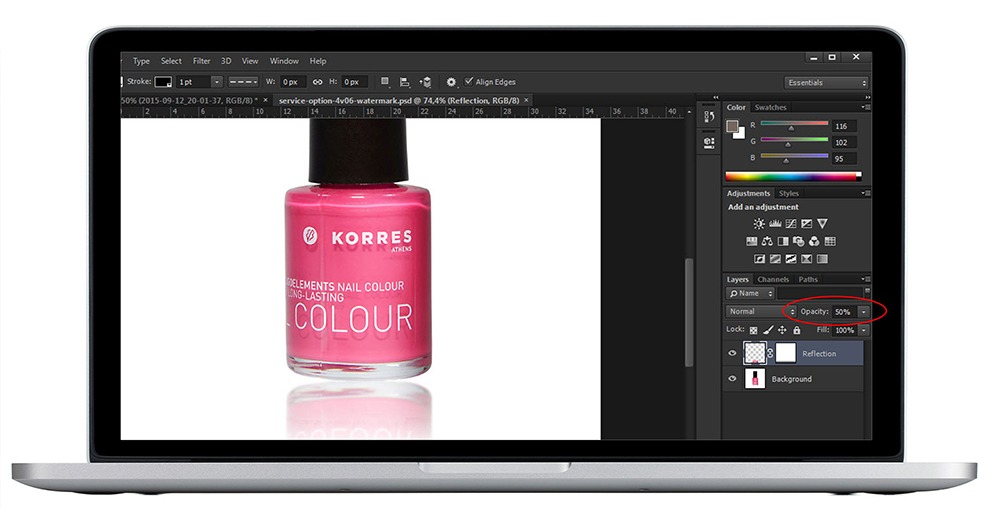
6. Reflection Tools for Product Images
Another way you can make your DIY product photos pop, without the need for fancy equipment, is using Photoshop to create reflections below your products using transform tools. This can be implemented on your white background product photos or in your lifestyle product photos.
Here’s a product-retouching Photoshop tutorial with mirror reflection to brush you up on this technique:
7. Using Spot Healing Tool to Improve Product Photos
Photoshop’s Spot Healing tools is another product image touch-up tool that every seller shooting their own product photos needs to know how to use.
Why?
Because it will help you quickly and effectively remove minor blemishes in your images, such as dust or loose threads that you didn’t notice when shooting your photos.
You can use Spot Healing for lifestyle and white-background product photos. Here’s a guide from a professional photographer on how versatile the Spot Healing tool can be for product, marketing and lifestyle post-production:
Additionally, here’s a step-by-step product-photo tutorial on how to specifically clean and remove dust.
8. Product Shadow Tutorials for Online Stores
Adding shadows can be a strategic way to make your products come alive, so to speak, in the minds of your shoppers. While shadows make your products look more real and three-dimensional, it’s better to do this at the post-production stage, instead of trying to get a product shadow while shooting.
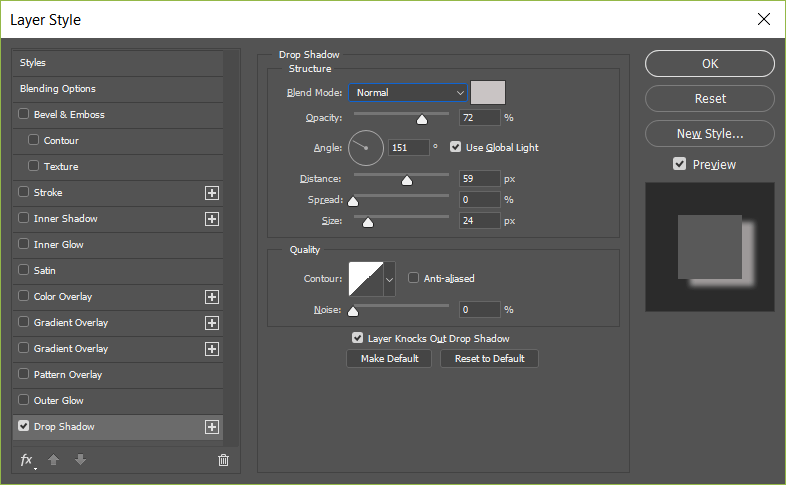
The newbie way to do this is with the help of Photoshop’s Drop Shadow blend mode.
However, you may want more flexibility in the shape and size of your shadow. Therefore, for those of you who are already familiar with Photoshop, here’s a tutorial showing you how to create realistic product shadows with Photoshop:
9. The Unsharp Mask Tool
When it comes to photoshop for eCommerce, the Unsharp Mask tool is another must-know. Simply put, this post-production tool will find and sharpen the edges of your product photo, giving the image a higher contrast.
Whether it’s sharpening logo text on a product or sharpening your entire product, the Unmask tool is versatile. However, it’s important to note that this tool is used to enhance a good-quality product photo; it can’t fix a poor-quality, blurry product photo.
To get you started, check out this Photoshop tutorial on how to sharpen a product photo:
Using Photoshop to Create Product Image Templates
10. Tutorial on Creating a Product Photo Template
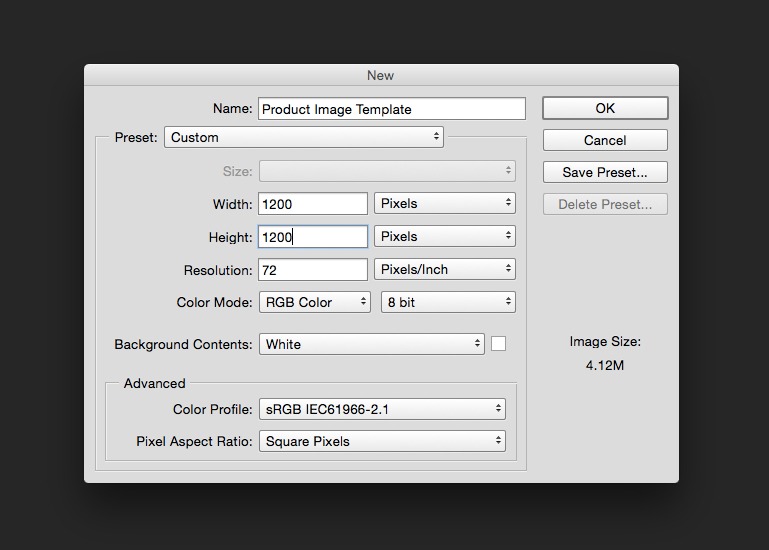
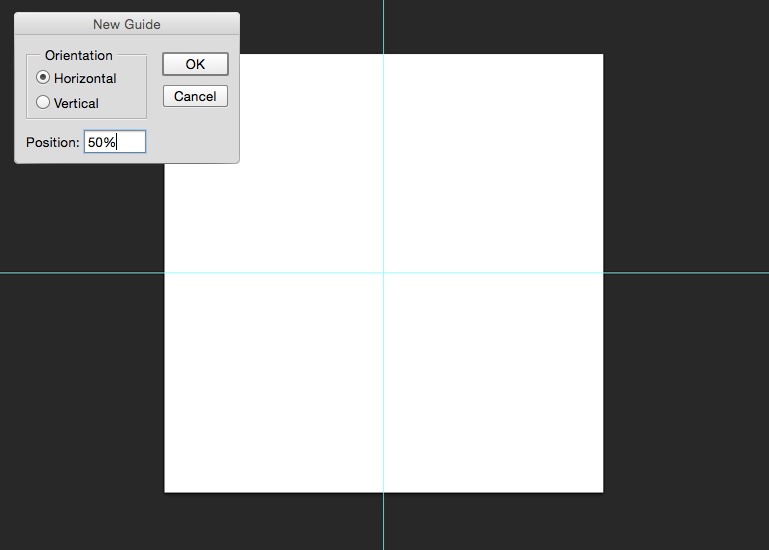
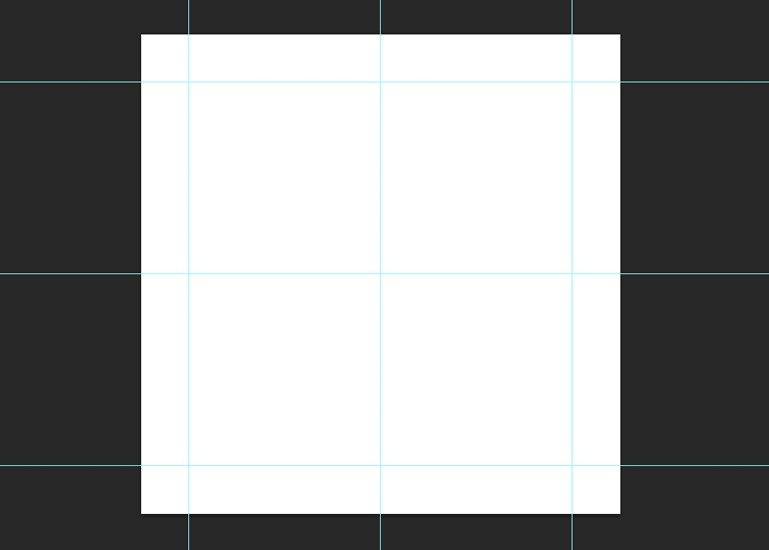
When it comes to DYI-ing your product photos, creating a template is a must in ensuring your product images are consistently sized, spaced and placed on your background. To create a template for your product photos, Pixc lays out the following five steps:
1. First, create a new Photoshop file setting your designed width-and-height dimensions and color mode.
2. Next, you want to create the center guidelines of your template to ensure you mark the middle.
3. After you have your center points, you will create your outer guidelines.
4. Add your product photo to your new template.
5. Save the image as your Photoshop template which you can use before doing the final save of your product photos.
Using Photoshop to Create eCommerce Marketing and Web Content
11. eCommerce Web Graphics Photoshop Tutorial
Want to turn your product photos into converting eCommerce marketing creatives and website displays? Then Photoshop is a huge asset, and you can bet there is a Photoshop tutorial out there to help.
Here’s one to get you started! In this eCommerce tutorial, designer Dansky shows us how to design a number of eCommerce graphics in Photoshop:
In fact, if you are looking to take your design skills to pro-level, Dansky’s whole YouTube channel is a treasure trove of high-value tutorials.
For more specific products and/or marketing channels and assets, here are some highly specific eCommerce Photoshop tutorials to get you started:
- Learn to create an eCommerce website sale banner in Photoshop
- eCommerce product page design tutorial in Photoshop
- Creating your first banner ad in Photoshop (beginner)
- Design a stunning sneaker advert
- Create a high-contrast black-and-white ad
- How to Make a Facebook Ads banner in Photoshop
- How to create eye-catching Facebook Carousel Ads with Adobe Photoshop
Using Photoshop to Create Product Design Integrations
12. Automating Product, Web and Ad Images Using Photoshop Actions
One of the best eCommerce Photoshop hacks out there is using the design program’s automation action to streamline product photo design. It is something that top eCommerce entrepreneurs are doing with a lot of success. A good example is the successful online legging store, Gearbunch, whose founder Luuk uses Photoshop automation to create ad images and shop-product images for each of their new designs with just one click.
Here’s a tutorial on how you can automate Photoshop using actions!
—
There you have it: how and why to use Photoshop for eCommerce!
Struggling with something in Photoshop that is not on this list of beginner and expert eCommerce tutorials above? Tell us about them in the comments, and we will help find you links to videos and how-to guides!

